- Published on
Docker Desktop Alternative
- Authors
- Name
- Will Krause
- @WilliamKrause4


On August 31st, 2021, Docker Desktop changed their licensing model so that it is no longer free to use for companies with more than 250 employees. Whether your company is willing and able to pay for enough seats for your team is subject to the whims of a procurement process that is often out of your control. What is a reasonable replacement for Docker Desktop?
While maybe not the trendiest answer, I think most people would be best served just running a Linux VM. At the end of the day, Docker is meant to run on Linux. Every solution that tries to bridge the host OS to a Linux VM or create a new subsystem has enough magic in it to cause trouble. If you can't reason about the underlying technology, it can be very difficult to fix problems unique to your host system. The safest and most portable solution is to just use a Linux VM. The salient question is, can we still create a developer experience that feels native while using a standard Linux VM? If you're comfortable working with VSCode, I believe the answer is yes.
This article is not meant to be an exhaustive comparison of your Docker Desktop alternative options. However, if you're like me, you have the questionable habit of reaching for the shiny new technology that has the potential to solve all of your problems. To save you some time, I will say that I briefly tried Rancher Desktop, and as the project states, it is still in beta. Some issues I found:
- Slow builds
- Drains your battery
- Has a clock drift problem if your laptop sleeps which makes it impossible to authenticate to use AWS services
- Incomplete API support
I have a lot of faith in the team behind Rancher and feel like when it reaches 1.0, it could very well be the defacto tool of local docker development. However, as of version 0.61, it is still too rough around the edges for my needs.
As another option, here is an article covering how to install docker-machine using homebrew, but notice that there are some reports of issues with macs with M1 chips.
So what did I do?
Below is a step by step tutorial covering how I configured my setup. It's nothing ground breaking, but it brings enough resources together that it might save you some time.
1. Install VirtualBox
Download and install VirtualBox. If this is your first time running VirtualBox you may need to enable some security settings and restart your computer.

2. Install your preferred linux distro
I installed Ubuntu Server 20.04, but any image capable of running Linux will do. If you would like a step by step guide, check out this one from James Hibbard.
3. Configure your network
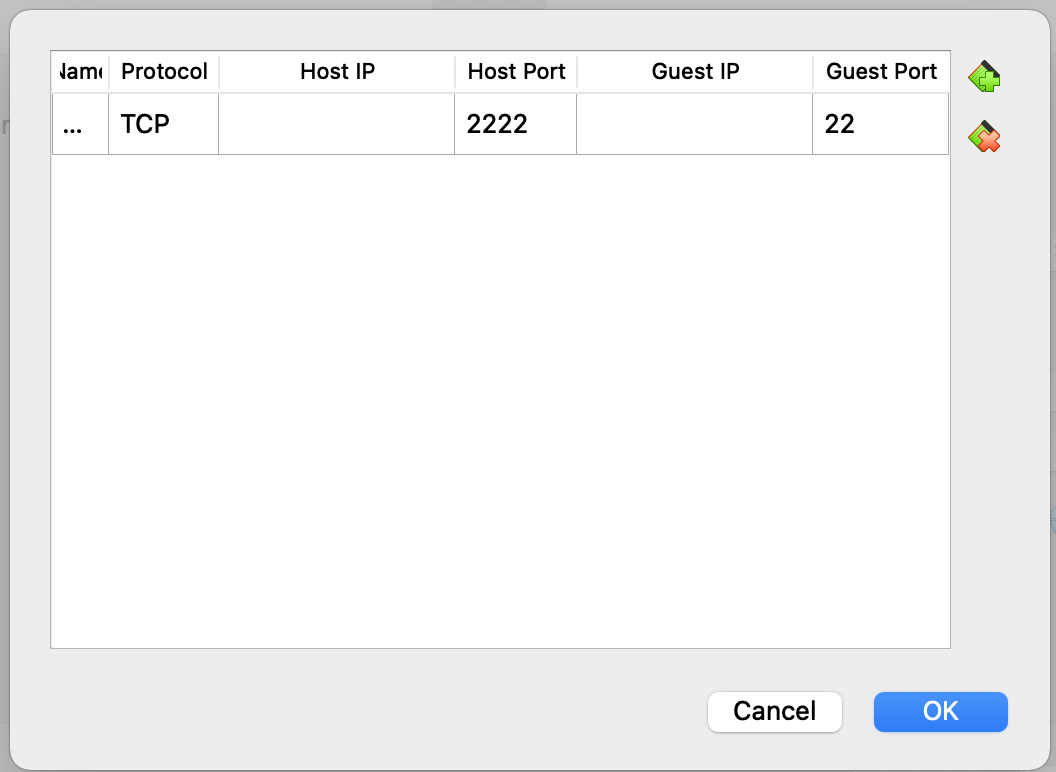
I found getting a bridge adapter to work with my corporate VPN to be a challenge. So I opted to use the NAT configuration which should just work with your host machine's VPN if it is active. Map some port (like 2222) on your host machine to port 22 on your VM. You can do this from Settings > Network > Advanced and then click the "Port Forwarding" button.

You should now be able to ssh into your VM:
ssh <user_name>@localhost -p 2222
If you haven't already, add your public key to the authorized_keys file on your VM so you can ssh into it without a password. Also, if you know what ports your development servers are going to run on, feel free to map those at this time.
4. Install your favorite shell add-ons
Even though we are using an isolated VM, the goal is to make the development flow feel like a natural extension of your primary development machine. In my case that meant installing the shell and shell plugins that I use on mac. Like many people, I like to use oh-my-zsh and powerlevel10k, both of which are easy to install for Ubuntu. My setup was configured as follows:
sudo apt install zsh
sh -c "$(curl -fsSL https://raw.github.com/ohmyzsh/ohmyzsh/master/tools/install.sh)"
git clone --depth=1 https://github.com/romkatv/powerlevel10k.git ${ZSH_CUSTOM:-$HOME/.oh-my-zsh/custom}/themes/powerlevel10k
sed -i 's~robbyrussell~powerlevel10k/powerlevel10k~g' ~/.zshrc #sed works with any separators ,not just "/"
Then run source ~/.zshrc and you should be prompted for the powerlevel10k install preferences.
I adjusted the value of POWERLEVEL9K_BACKGROUND to 160 (red) to help make it clearer when I am working in the VM. If you'd like to see all of your color options, run the following command:
for i in {0..255}; do print -Pn "%K{$i} %k%F{$i}${(l:3::0:)i}%f " ${${(M)$((i%6)):#3}:+$'\n'}; done
5. Install Docker
Installing Docker should be fairly straight forward. This is the guide for Ubuntu. And because they don't include the steps to run docker without using sudo in the installation guide, I'll save you a trip:
sudo groupadd docker
sudo usermod -aG docker $USER
newgrp docker
6. Install VSCode Remote - SSH
If you just want to use Docker to build and run containers, then you can stop at step 5. However, I've found the remote development tools from VSCode to be extremely valuable. Install the Remote - SSH extension. Then add the command to ssh into your VM when prompted. Making sure your public key is included in the authorized_keys file is important for this step.
After you add you ssh information, VSCode makes an entry in your ~/.ssh/config file. If you ever need to remove a host from the list, just edit that file and remove the host information you wish to delete. A benefit of populating ~/.ssh/config is you can now just run ssh localhost.
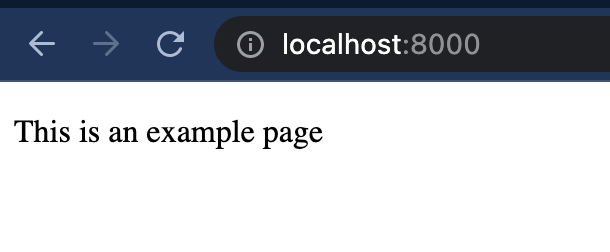
If you want to do a quick test, assuming your VM is Ubuntu, run the following:
mkdir simpleserver
cd simpleserver
echo '<!doctypehtml><html><head><title>Test</title></head><body><p>This is an example page</p></body></html>' > index.html
python3 -m http.server
To see your webpage in your local browser, map a port to port 8000 on your VM, like we did for port 22 to allow for ssh. If you mapped local port 8000 to the VM port 8000, you can open http://localhost:8000 and you should see the following:

7. Create startup and shutdown scripts
Swap out for your variables where appropriate, but this is what I chose to do.
alias dstop='ssh -p 2222 -t <user_name>@localhost sudo poweroff'
alias dstart='VBoxManage startvm "ubuntu" --type headless && ssh -p 2222 <user_name>@localhost'
Tips
For most of my workflows, files are transferred via git. However, if you need to transfer files to your VM from your local machine you have two options:
- Install Guest Additions and setup a shared folder
- Use scp/sftp to transfer files
I prefer option two because it is easier to setup and is a workflow that would also work for a remote Linux server.
Conclusion
This configuration might not be ideal for everyone, especially if you prefer using an editor other than VSCode. However, the strength of this method is its simplicity. This setup should work for macOS or Windows and the development tools also work on remote Linux servers. It is also almost guaranteed to keep working indefinitely as VirtualBox is a very mature offering, and there is very little magic in this setup.